Tuesday, December 31, 2013

Microsoft Dynamics AX 2012 Enterprise Portal Performance Tips


Role Centers

  1. Cues - Make sure the Queries used by Cues has indexes on the fields used in the ranges.
  2. Cues- Do not have more than 6 cues in one role center page
  3. Reports/Charts - Do not have more than 2 reports or charts in a role center page
  4. UnifiedWorklist – Make sure old records in EventInBox , WorkflowWorkItemTable,  smmActivities are periodically archived and removed from the production database.

Lookups

  1. Lookups can be marked as Client-side lookup. The data for the first page of the lookup will be fetched when the page is initially rendered. When the user clicks the lookup button, the lookup will be displayed immediately on the client side without going back to the server.
  2. If the lookup is generally small (less than 50 items), marking it as a client-side lookup is recommended.  For that, set the LookupStyle to Preload.If the lookup values do not change (for example currency, state, country, and so on), then set the LookupCacheScope to Global or DataBindingContainer. For example
private void AttachLookupsToBoundFields()
{
foreach (DataControlField dcf in this.Group_Transaction.DataControlFieldCollection)
   {
          AxBoundField boundField = dcf as AxBoundField;
          if (boundField != null)
            {
                switch (boundField.DataField)
                {
                    case "ExchangeCode":
                        boundField.LookupStyle = LookupStyle.PreLoad;
                        boundField.LookupCacheScope = CacheScope.Global;                     
                        break;
                    case "PayMethod":
                        boundField.Lookup += new EventHandler<AxLookupEventArgs>(PayMethod_Lookup);
                        boundField.LookupStyle = LookupStyle.PreLoad;
                        boundField.LookupCacheScope = CacheScope.DataBindingContainer; // since CostType is not changing on this page, we can cache it for the form                       
                        break;
                   }
               }
    }
}


List Page


  1. You can control the page size of all list pages installation wide from System Administration > Setup >Enterprise Portal > Enterprise Portal Parameters > General > Number of rows to display in list pages. After making a change, make sure the cache is cleared in Enterprise Portal for this setting to take effect. 
  2. Do not display more than 20 records in one page in a list page.
  3. Use Display Methods in grid with caution. They are evaluated for every row and are generally time consuming. If you need to display calculated values, then have them displayed in a fact box or in a preview pane, so that it gets calculated only for the selected row and not for all rows returned by the query. Also enable caching on Display Methods.
  4. For the queries used in factboxes/related information make sure they have appropriate indexes
  5. In Factboxes are using expensive quries, delay load it. ( either load asynchronously or make it as a dialog which the user can invoke through action pane when needed)
  6. Do not have more than 8 columns in the grid.
  7. For the factbox/preview pane , do not have more than 5 rows per page in case of grid
  8. For the secondary list pages , make sure appropriate index is there for the fields used in the ranges and sort orders
  9. For polymorphic tables, make sure adhoc mode is set. ( set OnlyFetchActive to yes in Dataset Datasources)
  10. Avoid changing any properties that trigger data binding in the prerender event of the GridView. Instead, do that in the page prerender


Detail Pages

  
  1. Cache the values in local variables for multiple code paths are calling, for example getting the current row.
  2. Set the AutoSearch and AutoQuery properties on the Data set data sources if the query is modified through code or through ranges added before the values are used. This will be beneficial mainly for create and edit scenarios where the query is always modified or the result set is not needed (in the case of create).
  3. Write managed code wherever possible for better performance and to avoid going back and forth from managed code to X++ through proxies.
  4. Use GetFieldValue instead of GetField to get the field values in managed code. GetField is on the AxaptaRecord, which is a wrapper around the X++ instance of the record. GetFieldValue is on the DataSetViewRow, which internally looks at the dbCache hooked to the X++ record. Use GetFieldValue whenever you can because then your code will benefit from the perf improvement.
  5. For polymorphic tables, make sure adhoc mode is set. ( set OnlyFetchActive to yes in Dataset Datasources)
  6. Avoid changing any properties that trigger data binding in the prerender event of the GridView. Instead, do that in the page prerender
  7. If you are using AppFabric for storing Server State, then you can also use AppFabric to store any other custom cache that you need for your customizations.
For example
 // Check the state cache
             IAxStateCache stateCache = AxStateCacheFactory.CreateStateCache(this.Page.Session);
             if (stateCache != null)
              {
                 object cachedState = stateCache.LoadState(this.GetExpenseTransToolbarMenuCacheKey());
                  if (cachedState != null)
                 {
                      // Got it from the cache - deserialize it
                     this.expenseTransToolbarMenu = WebMenuItemMetadataHierarchicalContainer.Deserialize((byte[])cachedState);
                  }
                  else
                  {
                      // Not found in the cache - create it
                      this.expenseTransToolbarMenu = this.GetExpenseTransToolbarMenu();

                      // Save it in the cache
                      stateCache.SaveState(this.GetExpenseTransToolbarMenuCacheKey(), this.expenseTransToolbarMenu.Serialize());
                  }
              }

  1. Minimize the page size as much as possible.  For complex forms, separate header and detail pages and display only the section that’s needed. Use Expense Report page as an example.


Configuration


  1. Use AppFabric for NLB topology or enable machine affinity.
<Microsoft.Dynamics>
   <AppFabricCaching Enable=”true” NamedCache=”FooCache” />
</ Microsoft.Dynamics>
  1. Set the MaxSessions in web.config to the maximum concurrent users that you expect for your scenario (taking available memory into account).
<Microsoft.Dynamics>     
 <Session Timeout="15" MaxSessions=”300”/>
</Microsoft.Dynamics>

Sending an e-mail using Outlook


We will send an e-mail using Outlook. We will incorporate customer data from the system into a template to create the e-mail's text.

In Dynamics AX, e-mails can be sent in several ways. One of them is to use Microsoft Office Outlook. The benefit of using Outlook is that the user can review e-mails and modify if required, before they are actually sent. Also, all the sent e-mails can be stored in the user's Outlook folders.

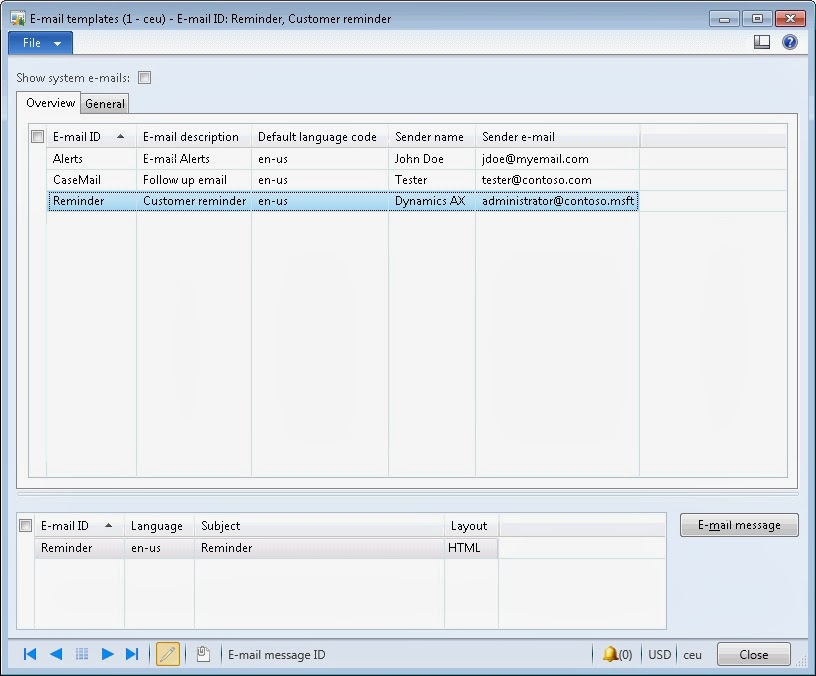
Before we start with the code, we need to create a new e-mail template. This is standard Dynamics AX functionality and can be found in Organization administration | Setup | E-mail templates. Open the E-mail templates form and create the following record:


Next, click on the E-mail message button and enter the e-mail body, as shown in the
following screenshot:


In the AOT, create a new job named SendCustReminderEmail with the following code (replace the customer account number with your own):
static void SendCustReminderEmail(Args _args)
{
     CustTable custTable;
     Map mappings;
     custTable = custTable::find('1101');
     mappings = new Map(Types::String, Types::String);
     mappings.insert('customer',custTable.name());
     mappings.insert('company',CompanyInfo::find().Name);
     mappings.insert('user',HcmWorker::find(DirPersonUser::current().worker()).name());
     SysINetMail::sendEMail('Reminder',custTable.languageId(),custTable.email(),mappings);
}

Run the job, and click on the Allow button once Microsoft Outlook displays the
following security warning:


To review the results, open Outlook and look for the newly created message in either
the Outbox or Sent Items folders. Note that all placeholders were replaced with
actual values from the system:


Thats all you are ready to go..!!

IaceTechnologies a nd Services.

X++ Script to renamePrimaryKey across companies


During data upgrade to AX2012 we had issue in ‘Product Upgrade’ preprocessing checklist. Validation errors were observed due to presence of same item in different companies with different‘DimGroupId’ or ‘ItemType’ values.

Accordingly the String size of ‘itemIdBase’ and ‘EcoResProductNumber’ EDTs were increased to 30 to avoid the truncation of ‘ItemId’ and ‘ProductNumber’.

Only way left to resolve the issue was by renaming the ‘ItemId’ of these items. So we renamed all the items which are of type ‘StopItem’ to ‘%Old Item Name’.

The best option left to optimize the work load instead of manually updating the item was to use the renamePrimaryKey method.

static void renamePKInventTable()
{
    #File
    #define.prefixItem('Old')
    InventTable     inventTable;
    container       getCompanyList;
    int             i;
    DataAreaName    id;

    container getCompany()
    {
        dataArea  dataArea;

        // Virtual Companies should not be added.
        while select dataArea
            where dataArea.isVirtual != NoYes::Yes
        {
            getCompanyList += [dataArea.id];
        }

        return getCompanyList;
    }
    ;

    getCompanyList = getCompany();

    for(i = 1; i<= conlen(getCompanyList); i++)
    {
        id = conpeek(getCompanyList, i);

        changeCompany(id)
        {
            inventTable.clear();

            while select inventTable
              where inventTable.RMCItemType == RMCItemType::StopItem
                 && inventTable.dataAreaId  == id
                 && !(inventTable.ItemId like 'Old*')
            {
                ttsbegin;

                inventTable.ItemId = #prefixItem +
                                     #delimiterSpace +
                                     inventTable.ItemId;
                                        
                inventTable.renamePrimaryKey();

                if(inventTable)
                {
                    inventTable.selectForUpdate(boolean::true);
                    inventTable.ItemName  = inventTable.ItemId;
                    inventTable.NameAlias = inventTable.ItemName;
                    inventTable.update();
                }

                ttscommit;
            }
        }
    }
}


This X++ script renamed all the Items in Item Master across companies except the virtual company...!!

Iace Technologies and Services...!!!


Generating Lookups using SysAttributes Class – Dynamics AX2012


Building custom lookups for displaying AOT elements using SysModelElements/UtilElementsId was usually performed by Query/QueryBuildDataSource instead we can generate same using SysAttribute . Similiar type of functionality is implemented across AX2012 and one such instance is usage of attribute for displaying Workflow queues.

In earlier or current release we have different ways of displaying lookups using table lookup, field group lookups, building reference lookup from custom form using FormAutoLookupFactory.


We are building runtime lookup by checking attributes whose values are ‘True’ and adding to the temporary table. This way we would display all the classes which has the following attribute syntax:


[SysClassEnabledAttributes(boolean::true, classStr(SysEnabledDocument))]

Where SysClassEnabledAttributes is a attribute base class which extends SysAttribute which helps us to build the required lookup


// <summary>
///    Finds the classes that extend the 
///    <c>SysEnabledAttributes</c> class that are queue enabled.
/// </summary>
/// <returns>
///    A <c>SysAttributeTmp</c> table buffer.
/// </returns>
public static SysAttributeTmp  getAllAttributes()
{
    #define.sysAttribute("SysClassEnabledAttributes")
    SysAttributeTmp                    attributes;
    List                               list;
    SysDictClass                       dictClass;
    DictClass                          currentClass;
    ListEnumerator                     listEnumerator;
    boolean                            flag = true;
    SysClassEnabledAttributes          attribute;

    dictClass = new SysDictClass(classNum(AbstractAttributesClass));
    listEnumerator = new ListEnumerator();
    list           = dictClass.extendedBy();
    listEnumerator = list.getEnumerator();

    while (listEnumerator.moveNext())
    {
        currentClass = new DictClass(listEnumerator.current());

        attribute = currentClass.getAttribute(#sysAttribute);
        if (attribute != null)
        {
            flag = attribute.parmFlag();

            if (flag)
            {
                attributes.Name        = dictClass.name();
                attributes.Description = attribute.parmName();
                attributes.insert();
            }
        }
    }

    return attributes;
}


Iace Technologies and Services


QueryValue function in Dynamics AX


Case Study: Below a sample example is illustrated on how query Value usage impacts the data retrieval in 
reports based on different customer data.


Monday, December 30, 2013

Retry -Sample Code


Here's a sample code taken from the AX class which shows the no of times you want to execute your code in try and catch statement.


try
{
ttsbegin;
reqCalcForecastItem.run();
ttscommit;

catch (Exception::Deadlock)
{
retry; 
} catch (Exception::UpdateConflict) 

if (appl.ttsLevel() == 0) 
{
if (xSession::currentRetryCount() >= #RetryNum) 

throw Exception::UpdateConflictNotRecovered;
}
else
{
retry;
}

else
{
throw Exception::UpdateConflict;
}
}

Microsoft Dynamics AX 2009 Application Integration Framework(AIF) Benchmark


Microsoft Dynamics AX 2009 Application Integration Framework Benchmark

Microsoft Dynamics AX Application Integration Framework Benchmark exercises Core Sales Order processing thru Invoicing and GL Creation thru posting with high degree of scale

In June 2008, Microsoft Corporation conducted the Microsoft Dynamics® AX 2009 Application Integration Framework (AIF) benchmark to measure the performance and scalability characteristics of Microsoft Dynamics® AX 2009 in a simulated distribution scenario. This benchmark exercised core Accounts Receivables scenario involving sales order creation thru AIF and invoicing of sales orders thru batch jobs. It also exercised core General Ledger scenario involving journal creation thru AIF and posting of journals thru batch jobs. The scenarios generated load on Application Object Server (AOS)—in this benchmark, each AOS instance was hosted on a separate server. In a Microsoft Dynamics® AX system, the AOS processes business logic in communication with clients and the database; the database server provides data to the AOS.

For more information and download please check the following link AX 2009 Application Integration Framework Benchmark

Dynamics AX 2012 inserting data in Resource Dimension and fetching Default Dimension


DimensionDefault getDimension(ResourceTable _Resource)
{

DimensionAttribute DimensionAttribute;
DimensionFinancialTag  DimensionFinancialTag;

Struct struct = new Struct();

container defaultDimensionCon;
DimensionDefault workerDimensionDefault;

;
DimensionAttribute =  DimensionAttribute::findByName('Resource');

DimensionFinancialTag = DimensionFinancialTag::findByFinancialTagCategoryAndValue(DimensionAttribute.financialTagCategory(),_Resource.value,true);
        if(!DimensionFinancialTag)
        {
            DimensionFinancialTag.clear();
            DimensionFinancialTag.Description=_Resource.description;
            DimensionFinancialTag.Value=_HcmWorker.PersonnelNumber;
            DimensionFinancialTag.FinancialTagCategory=DimensionAttribute.financialTagCategory();
            DimensionFinancialTag.insert();


struct.add('Resource', _HcmWorker.PersonnelNumber);

defaultDimensionCon += struct.fields();

defaultDimensionCon += struct.fieldName(1);

defaultDimensionCon += struct.valueIndex(1);

workerDimensionDefault = AxdDimensionUtil::getDimensionAttributeValueSetId(defaultDimensionCon);

return workerDimensionDefault;
    }
    else
        return 0;
}

Dynamics AX 2012 Code to meagre MainAccount Dimesion and Default Dimesion


Below is the to Code to meagre  MainAccount Dimesion and Default Dimesion   to get Ledger Dimension Account which is used in segmented while creating Journal voucher in LedgerJournalTrans


static void CreateLedgerDimension(Args _args)
{
     LedgerDimensionAccount  ledgerDimension,defaultDimension;
     LedgerDimensionAccount  empledgerdimension;
     LedgerDimensionAccount  mainAccDimension;
     HcmPositionDefaultDimension (empPositionDimension
     HcmPositionWorkerAssignment HcmPositionWorkerAssignment;
    
mainAccDimension = PayHeadTable::find('BasicRate').DebitAccount;

HcmPositionWorkerAssignment =   HcmPositionWorkerAssignment::getActivePositionWorkerAssignment(HcmWorker::findByPersonnelNumber('PID-0937').RecId);
       
select empposdimension where empposdimension.Position == HcmPositionWorkerAssignment.Position;
       
if(empPositionDimension)
empledgerdimension  =   empPositionDimension.DefaultDimension;

     defaultDimension = DimensionDefaultingService::serviceCreateLedgerDimension(mainAccDimension, empledgerdimension);


     info(strFmt("Before: %1", DimensionAttributeValueCombination::find(defaultDimension).DisplayValue));


}

Peformance issue while importing Bill Of Materials


In manufacturing companies you can have a lot of Bill Of Materials (BOM). When the Bill Of Materials are created for an integration to PLM or CAD systems or during data migration, the total of lines can be more than a million.

The problem is that the validation for the BOM lines will validate the structure of the BOM to check for circular references. Many times the check is specified on the most detailed level. When data is imported from a PLM or CAD system or for Data migration, the structure is checked and validated in the original application, so validation is not required in most of the cases. This check can be changed in the inventory parameters.

When you import the data into Microsoft Dynamics Ax, it can happen that the import will be slower and slower and slower.


To keep performance switch the setting to none or to BOM, but don’t use line. Keep this in mind when you have trouble with the performance of the BOM lines.

Iace Technologies & Services..!!

Creating a general journal Posting a general journal


Journals in Dynamics AX are manual worksheets that can be posted into the system.One of
the frequently used journals for financial operations is the General journal.

It allows processing virtually any type of operation:

  • ledger account transfers
  • fixed asset operations
  • customer/vendor payments
  • bank operations
  • project expenses
In this, we will demonstrate how to create a new general journal record from code.


1. In the AOT, create a new class named LedgerJournalTransData and add a create method with the following code:

public void create(boolean _doInsert = false,boolean _initVoucherList = true)
{
lastLineNum++;
journalTrans.LineNum = lastLineNum;
if (journalTableData.journalVoucherNum())
  {
        this.initVoucher(lastVoucher,false,_initVoucherList);
  }
this.addTotal(false, false);
if (_doInsert)
  {
        journalTrans.doInsert();
  }
else
  {
        journalTrans.insert();
  }
if (journalTableData.journalVoucherNum())
  {
        lastVoucher = journalTrans.Voucher;
  }
}

2. Open the LedgerJournalStatic class, and replace its newJournalTransData() method with the following code:

JournalTransData newJournalTransData(JournalTransMap _journalTrans,JournalTableData _journalTableData)

{
       return new LedgerJournalTransData(_journalTrans,_journalTableData);
}

3. On DimensionAttributeValueCombination table write a method With following Code

public static LedgerDimensionAccount getLedgerDimension(MainAccountNum _mainAccountId,
container _dimensions, container _values)
{
MainAccount                                       mainAccount;
DimensionHierarchy                             dimHier;
LedgerChartOfAccountsStructure        coaStruct;
Map                                                    dimSpec;
Name                                                  dimName;
Name                                                  dimValue;
DimensionAttribute                              dimAttr;
DimensionAttributeValue                     dimAttrValue;
List                                                     dimSources;
DimensionDefaultingEngine                  dimEng;
int i;
mainAccount = MainAccount::findByMainAccountId(_mainAccountId);
if (!mainAccount.RecId)
{
return 0;
}

select firstOnly RecId from dimHier where dimHier.StructureType ==
DimensionHierarchyType::AccountStructure && dimHier.IsDraft == NoYes::No exists join coaStructwhere coaStruct.ChartOfAccounts == LedgerChartOfAccounts::current() && coaStruct.DimensionHierarchy == dimHier.RecId;
if (!dimHier.RecId)
{
return 0;
}
dimSpec = DimensionDefaultingEngine::createEmptyDimensionSpecifiers();
for (i = 1; i <= conLen(_dimensions); i++)
{
dimName  = conPeek(_dimensions, i);
dimValue  = conPeek(_values, i);
dimAttr     = DimensionAttribute::findByName(dimName);
if (!dimAttr.RecId)
{
continue;
}
dimAttrValue = DimensionAttributeValue::findByDimensionAttributeAndValue( dimAttr, dimValue, false, true);
if (dimAttrValue.IsDeleted)
{
continue;
}
DimensionDefaultingEngine::insertDimensionSpecifer( dimSpec, dimAttr.RecId, dimValue, dimAttrValue.RecId, dimAttrValue.HashKey);
}
dimSources  =  new List(Types::Class);
dimSources.addEnd(dimSpec);
dimEng = DimensionDefaultingEngine::constructForMainAccountId( mainAccount.RecId,dimHier.RecId);
dimEng.applyDimensionSources(dimSources);
return dimEng.getLedgerDimension();
}
4. Create a new job named LedgerJournalCreate, with the following code:
static void LedgerJournalCreate(Args _args)
{
LedgerJournalTable                                                     jourTable;
LedgerJournalTrans                                                     jourTrans;
LedgerJournalTableData                                              jourTableData;
LedgerJournalTransData                                              jourTransData;
LedgerJournalStatic                                                     jourStatic;
DimensionDynamicAccount                                         ledgerDim;
DimensionDynamicAccount                                        offsetLedgerDim;
ttsBegin;
ledgerDim = DimensionAttributeValueCombination::getLedgerDimension( '110180', ['Department', CostCenter', 'ExpensePurpose'], ['OU_2311', 'OU_3568', 'Training']);

offsetLedgerDim = DimensionAttributeValueCombination::getLedgerDimension( '170150',['Department', 'CostCenter', 'ExpensePurpose'],['OU_2311', 'OU_3568', 'Training']);

jourTableData                     = JournalTableData::newTable(jourTable);
jourTable.JournalNum         = jourTableData.nextJournalId();
jourTable.JournalType         = LedgerJournalType::Daily;
jourTable.JournalName       = 'GenJrn';
jourTableData.initFromJournalName(LedgerJournalName::find(jourTable.JournalName));
jourStatic                            = jourTableData.journalStatic();
jourTransData                     = jourStatic.newJournalTransData( jourTrans, jourTableData);
jourTransData.initFromJournalTable();
jourTrans.CurrencyCode    = 'USD';
jourTrans.initValue();
jourTrans.TransDate           = systemDateGet();
jourTrans.LedgerDimension= ledgerDim;
jourTrans.Txt                     = 'General journal demo';
jourTrans.OffsetLedgerDimension = offsetLedgerDim;
jourTrans.AmountCurDebit = 1000;
jourTransData.create();
jourTable.insert();
ttsCommit;
info(strFmt("Journal '%1' has been created", jourTable.JournalNum));
}

5. Run the job and check the results by opening General ledger | Journals |
General journal


6. Click on the Lines button to open journal lines and notice the newly created line:


Posting a general journal

1. Open General ledger | Journals | General journal, and find previously created Journal or manually create a     new one. Note the journal's number.
2. In the AOT, create a new job named LedgerJournalPost with the following code

 //   (replace the text 000420_010 with the journal's number from the previous step):
static void LedgerJournalPost(Args _args)
{
   LedgerJournalCheckPost jourPost;
   LedgerJournalTable jourTable;
   jourTable = LedgerJournalTable::find('000420_010');
   jourPost = LedgerJournalCheckPost::newLedgerJournalTable( jourTable,   NoYes::Yes);
jourPost.run();
}

3. Run the job, and notice the Infolog, confirming that the journal was successfully posted:

4. Open General ledger | Journals | General journal and locate the journal to make
sure that it was posted


I-ace Technologies and Services 

Creating a purchase order and Posting a purchase order

Creating a purchase order

Purchase orders are used throughout the purchasing process to hold the information about
the goods or services that a company buys from its suppliers. Normally, purchase orders are
created from the user interface, but in automated processes, purchase orders can be also
created from code.

1 In the AOT, create a new job named PurchOrderCreate with the following code:

static void PurchOrderCreate(Args _args)
{
NumberSeq numberSeq;
PurchTable purchTable;
PurchLine purchLine;
ttsBegin;
numberSeq = NumberSeq::newGetNum(
PurchParameters::numRefPurchId());
numberSeq.used();
purchTable.PurchId = numberSeq.num();
purchTable.initValue();
purchTable.initFromVendTable(VendTable::find('1001'));
if (!purchTable.validateWrite())
{
throw Exception::Error;
}
purchTable.insert();
purchLine.PurchId = purchTable.PurchId;
purchLine.ItemId = '1205';
purchLine.createLine(true, true, true, true, true, true);
ttsCommit;
info(strFmt(
"Purchase order '%1' has been created",
purchTable.PurchId));
}

2. Run the job to create a new purchase order.

3. Open Procurement and sourcing | Common | Purchase orders | All purchase
orders to view the created purchase order:

and see your purchase order is created.. 

This Will helps u to create a Purchase Order..!! Now How to do posting of this..

In Dynamics AX, a purchase order goes through a number of statuses in order to reflect its
current position within the purchasing process. This status can be updated either manually by
using the user interface or programmatically from code.

1. In the AOT, create a new job named PurchOrderPost with the following code
(replace 000409 with your number):
static void PurchOrderPost(Args _args)
{
PurchFormLetter purchFormLetter;
PurchTable purchTable;
purchTable = PurchTable::find('000409');
purchFormLetter = PurchFormLetter::construct(
DocumentStatus::PurchaseOrder);
purchFormLetter.update(
purchTable,
'',
systemDateGet(),
PurchUpdate::All,
AccountOrder::None,
NoYes::No,
NoYes::Yes);
}

2. Run the job to post the specified purchase order and display the purchase
order document:

3. Open Procurement and sourcing | Common | Purchase orders | All purchase
orders, and notice that the Approval status of the posted order is now different:

and see your order status is Confirmed...!!


Have a good day and of course any comments are welcome,
I-ace Technologies and Services